eprolo
Visbella DIY Auto headlight restoration kit car
Visbella DIY Auto headlight restoration kit car
Couldn't load pickup availability
|
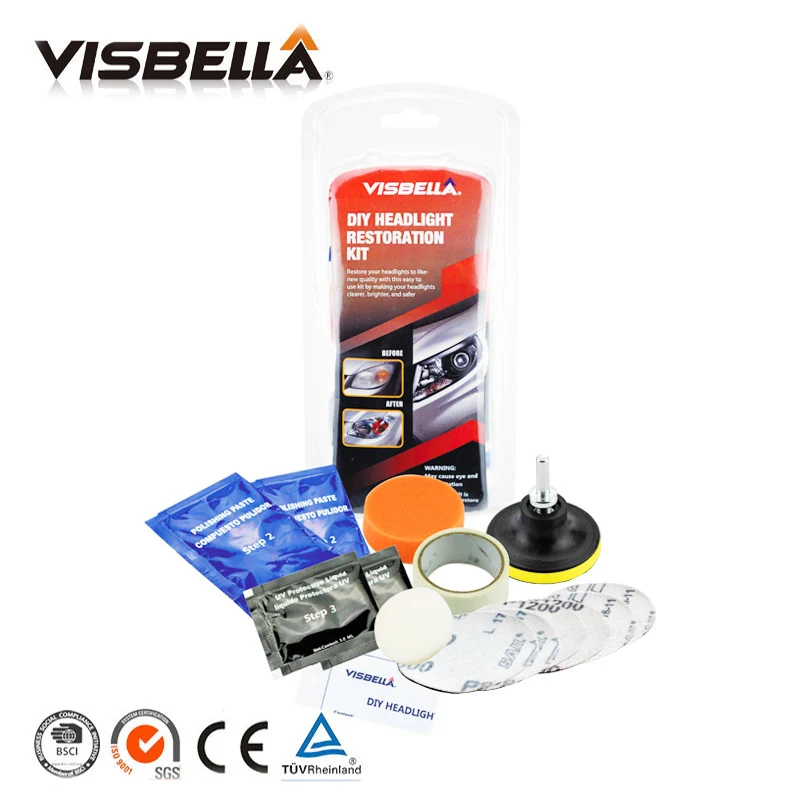
Product descriptions: Plastic lens can yellow with age, reducing headlight brightness, and new lenses can be expensive. The headlight restoration kit lets you shine and restore plastic lens, including headlights, tail lights, fog and directional lights. By restoring clarity to the lens, the performance of the headlight is improved and the appearance of the vehicle is enhanced. Now you can produce professional results with the headlight restoration kit. Kit includes all items necessary to perform the task.
Kit Containt: 2x P800 Sanding Discs 2x P1200 Sanding Discs 2x P2000 Sanding Discs 1x Sponge Disc 2x 40gm Polish Paste 2x 3.0ml Protect Liquid 1x Mask Tape (300x2cm) 1x Backer Pad M10 Thread 1x Adaptor 1x Sponge Disc White
TRUE FEEDBACKS FROM BUYERS:
BEFORE AFTER
| ||||||||
| ||||||||
| ||||||||
Advantage & Features | ||||||||
|
Helps restore clear plastic by removing haze and discoloration. Provides a deep clean to yellowed, hazed headlights with the use of a specially designed polish and sealant. Improves visibility and safety. One kit is intended to restore two headlight lenses. This inexpensive kit saves hundreds of dollars and restores crucial night time visibility by restoring your own lenses. Easy, 5-step process requires as little as an hour to remove scratches and restore cloudy, dull lenses.
| ||||||||
| How to use it | ||||||||
|
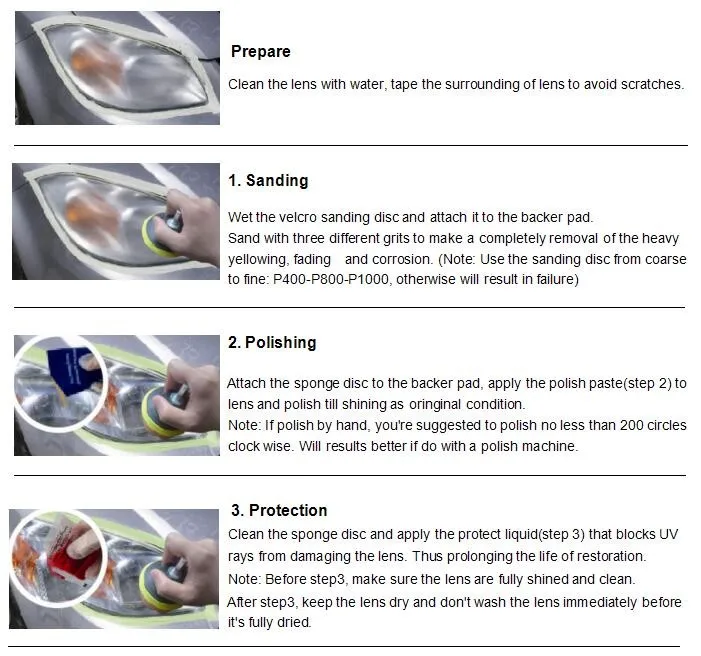
Process: Mask Protect trim and painted surfaces around the headlight lens with masking tape. Clean & lubricant Using the spray bottle (STEP 1), apply enough lubricant to the lens surface before sanding. Sand (about 2-3 minutes) Wear attached gloves, Using three grits (P400,P800,P1000) sanding disc orderly to sand away the yellowing and surface defects from lens. Replace with a new sanding disc if need and continue sanding until the yellow layer completely removed. Spray lubricant to the surface if it becomes dry while sanding. Refine Dispense some polishing paste (STEP 2) onto the cleaning cloth to polish out the remaining scratches. When the cloth becomes dry, continue by adding some polishing paste until the sand scratches have been removed and the lens is clear. Polish and Protect Remove the masking tape and wipe the headlight lens using attached cleaning cloth. Using UV Protective Paste (STEP 3) to polish and prevent UV damage.
NOTICE :How to apply UV Protective Paste ? In a cool shade , using UV Protective Paste to polish headlight surface with white sponge gently toward a direction of smearing until the varnish is evenly coated on the lamp surface. Set it aside for 15 minutes 10-15min (time control is very important ),then the car moved under the sun (exposure above 2 hours)
Precautions
Avoid eye contact. Do not get on skin or clothing. Avoid breathing of vapors. Use only with adequate ventilation. Do not swallow. Wash thoroughly after handling. Close container after each use.
| ||||||||
|